Continuing from last week I finish the install of the supplemental braking system and get the Jeep hooked up to the motorhome.
One essential element to the whole system is the ability to use the brake lights on the Jeep as if they were trailer lights. The Jeep is in essence a trailer behind the motorhome and trailers have to have trailer lights for brake and turn signals. There are multiple ways to accomplish this using aftermarket kits. I chose to use a wiring harness kit that uses the Jeeps tail lights to do this. The harness included blocking diodes to prevent backfeeding the signals into the Jeep’s electrical system. It just plugs into the existing connectors behind the tail lights. No splicing required.


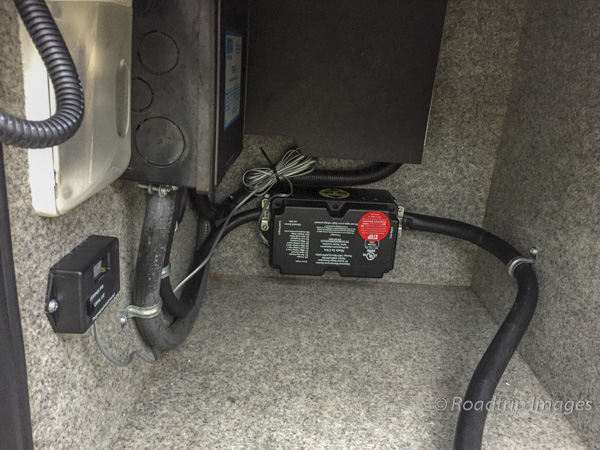
The wiring harness is then run from the rear of the car up to the front and into the engine compartment. I covered it with wire loom the entire way making sure it was zip tied away from hot or moving parts. Once in the engine compartment it could be connected to the wires from the two SMI braking system boxes. I used heat shrink crimp connectors to make the connections and then put an additional layer of heat shrink tubing over that. Then to be totally overkill, I put as many of the wires as I could into wire loom and zip tied it to various fixed points in the engine compartment.


Two additional connections need to be made to the operating unit box that’s in the engine compartment. The air pressure line that goes to the cylinder mounted on the brake pedal arm needs to connect to supply compressed air to actuate the brake pedal. A larger diameter vacuum hose also connects in to the box and gets teed into the existing vacuum boost line to the master cylinder. This provides the equivalent of power brakes even though the engine is off.

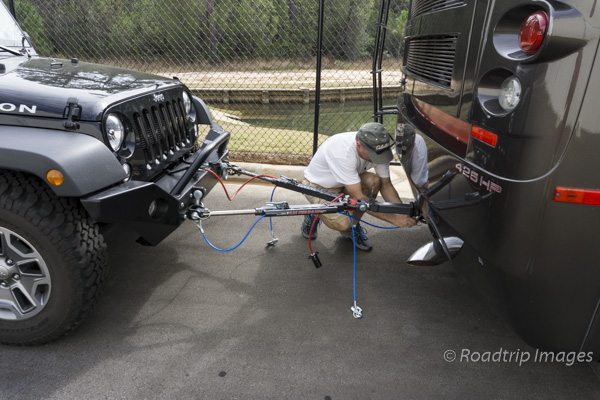
Once everything was connected under the hood I was able to move to the connectors that mount to the front bumper. Before we moved out of the house I installed an aftermarket front bumper from Rockhard 4X4. It’s a beefy unit made out of 1/4″ thick steel. It also had the ability to add tow bar brackets that bolt right to the Jeep’s frame. It not only looks better than the stock bumper it’s much stronger than the tow bar brackets that install under the factory bumper.
There are two connectors needed. One is for the trailer light signals that come from the motorhome and the second is a breakaway switch. If the car was ever to come detached from the towbar, the breakaway switch would get pulled and the system would apply the car’s brakes to stop it. There are safety cables to keep the car behind the motorhome in that event but the brakes need to be applied to keep it from running into the back of the coach.


To actually tow the Jeep, a towbar is connected from the motorhome to the car. There are several brands out there and I selected the Blackhawk 2 from Roadmaster. The Blackhawk 2 is rated for 10,000 pounds. The Jeep is about 4500 pounds so plenty of spare capacity there. I like that. Connecting it up is pretty easy although it is a heavy unit. It mounts directly into the motorhome’s receiver which is also a 10,000 pound capacity hitch. The arms that connect to the Jeep have telescoping bars so you just have to get the Jeep close and you can hook it up. Once the bars pull out all the way they lock into place. Hook up the safety cables, the breakaway switch and the lights and you’re ready to tow!


The nice thing about the Jeep Wrangler is that you just have to shift the transfer case into neutral and the transmission is disconnected for towing. In order to tow with all four wheels down you need this ability. Many four wheel drive cars have it but you should check your owners manual to be sure. Most 2 wheel drive cars can’t be towed 4 down without providing for some way to lubricate the transmission while towing. It’s possible but not straightforward. The Wrangler also doesn’t have a steering column lock so no need to turn the ignition on while towing and running down the battery.
All in all the installation was fairly easy. I’ve certainly had worse jobs working on cars. Many people opt to have this work done by a trailer or hitch shop and that’s certainly an option if you’re not comfortable with this kind of work. I did get a quote from one shop just to see what it would cost. I saved about $1,000 by doing it myself. Some of the savings were in the parts themselves but mostly it was labor.
So, we’re close to having things ready to be full time in the motorhome. We’re planning a quick trip to meet up with some friends a couple hours away so we’ll take the coach over for a shakedown cruise. More on that next time.