Kofa National Wildlife Refuge (Plus how to shoot into the sun)
The Kofa National Wildlife Refuge in Southwest Arizona can look pretty sparse at first but with the right combination of elements a pretty dramatic photograph can be made. Shooting into the sun is one of those elements but you have to overcome some issues first.
Kofa National Wildlife Refuge
This refuge is in Southwestern Arizona between Yuma and Quartzsite. It’s 665,400 acres of desert wilderness area with several species of wildlife including desert Bighorn Sheep. We explored part of this refuge while staying in Quartzsite for a few weeks. It’s accessed off US 95 with only a few dirt roads leading into the refuge. At first glance the landscape looks pretty bleak. Not much color. Lots of cactus and small brush like plants. Lots of bare ground. That’s during midday when the lighting is least favorable. In the spring time there is a desert flower bloom that I’m told is very nice. We were there in December however so didn’t see any of that.
Scouting for the Image
Karen and I spent a fair amount of time driving the dusty dirt roads that lead into the refuge looking for compositions with the tall saguaro cactus. There were a lot of cacti around but I also had in mind a shot with one of them backlit by the setting sun. So we needed to find one by itself that had a pleasing shape. Another element I wanted to add were the small cholla cactus plants. When these are backlit by the sun they just seem to glow so I wanted a scene with a single saguaro cactus surrounded by cholla cacti and facing into the sun. Not too much to ask, right?
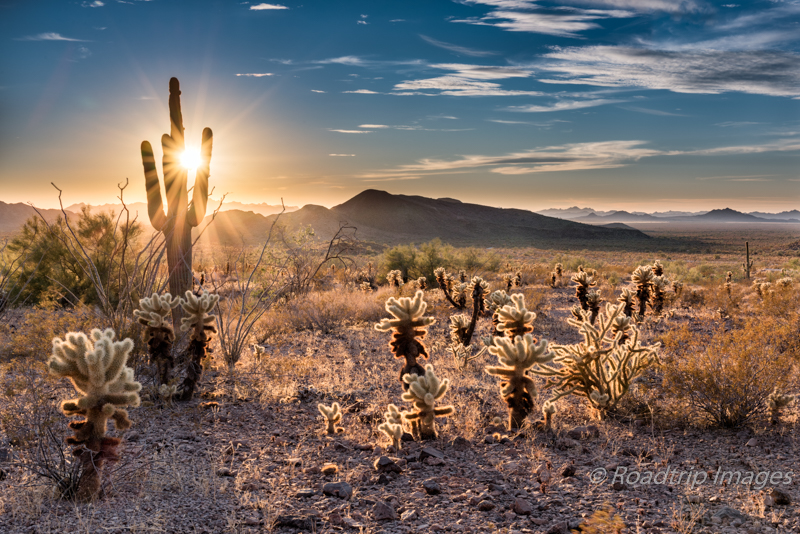
Well it does take some time to find a scene where all those elements line up. We drove around a lot. It also helps to have an app like Photopils so you know exactly where the sun will set in relation to the scene you’re looking at. I mentioned this app in the Resources section. Perseverance paid off and we finally found the composition you see above. I also liked the several layers of hills/mountains in the background. With the evening light they kind of fade off into the distance. Oh, and the thin light clouds add a lot as well. A bare, or bald, sky is not what I wanted.
Making the Image
I knew I wanted the sun to peek out from behind the saguaro and this particular one had the arms coming out from the side that formed a perfect notch to place the sun into. Again, the Photopils app really helps here. I placed the large saguaro off to the left and the sun at the upper third point using the rule of thirds compositional guide. The small cholla cacti on the ground really catch the low angle light with their thorns. It makes the whole plant seem to have a halo around it. Now that all the visual elements were in place I had to take care of one more pesky item when you shoot directly into the sun. Lens flare.
As you can see from the image below left, there are several lens flares in the raw image. Some people like to include these as an artistic element, others don’t. I try to eliminate them when I can. Lens flares come about when you shoot into a very bright light source like the sun. The multiple lens (glass) elements inside the lens reflect and scatter the extremely bright light back and forth causing these flare spots to occur. Zoom lenses tend to be worse at this as they have more lens elements than prime lenses.
So how do you avoid this? Well, you can just block the sun from the image using your hand like I did in the image below right. With these two images I can blend the best parts of both together. Needless to say you must use a tripod to do this. Everything needs to line up for the blend to work. This technique does take some trial and error. Using the cameras live view mode you can see where you need to hold your hand to block the sun. Then you need to hold still while pressing the shutter. It can take a few attempts until you get it right. You can’t take too long because the sun is setting and will soon move out of the notch in the cactus. No pressure.


Post Processing
Blending tasks like this is where Photoshop really earns its keep. Blending these two images back in my analog darkroom days would have been next to impossible. I first get the two images to have a similar exposure and contrast look inside of Lightroom. I do the lens corrections there too. I then export both images over to Photoshop. Since this is a fairly complex blend I won’t cover all the details here but conceptually I just used the image with the lens flares as the background or base layer. I then brought in the image with my hand blocking the sun as a second layer. Adding a black mask to this layer allowed me to be able to brush in just the areas of the second image I needed to eliminate the lens flare effects from the base layer. This is done with a fairly light brush using maybe 10-15% flow and pretty soft edges. In addition to the actual flares, the bottom right quarter of the image is somewhat washed out from the lens flare effects. The image with my hand blocking the sun is much cleaner in this area.
Once the blend was done I could turn my attention to the image as a whole and adjust several other aspects, like the sky for example. It needed some enhancement without affecting the rest of the image too much. Here I used a luminosity mask to isolate the sky from the rest of the image. I could then apply several adjustments to give it a better balance with the foreground. Fortunately none of it was blown out so I could use the original image to do this. I didn’t need to do a sky replacement from a third image but I did bracket my shots so I had one just in case.
I also wanted to bring out the sunburst effect a little more so I added another layer where the contrast was ramped up kinda high. Again, a black mask on this layer blanks this out and is only shown where I lightly brush it in. In this case the sunburst rays themselves. Not too much, it needs to be believable. I could go on with other enhancements I made but you get the main point.
Final Thoughts
Shooting into the sun requires some additional work in the field for it to be successful. You can leave the lens flares in and just say it was artistic license but the flare effect really impacts much of the image. It reduces the overall contrast and gives it a washed out look. If you take a little extra time you can come away with a much cleaner looking image without the distracting flare spots. That’s my preference anyway.
Kofa National Wildlife Refuge was an interesting desert landscape to work in. It takes some extra effort to find compositions but they’re there. If we were to go back, a visit in the Spring would be my preference. The cactus flower bloom would be an interesting contrast of colors and textures to work with. So many places, so many choices.
As always, you can see higher resolution images on our Facebook page. Please give us a like while you’re there.
Nikon D810 with Nikkor 24-70mm @44mm. f/16 at 1/40 second. ISO 64.
Comments are closed.