Milky Way photographs are very popular online these days so I thought I’d try some more night time sky photography. There’s quite a bit to a shot like this and I learned a few things I’ll do differently next time.
Research & Basic Elements
As you do your research on shooting the Milky Way, the first thing you need to find out is where is it in the night sky? For those of us in the Northern Hemisphere, it’s in the Southern sky. It stretches for quite a ways across the sky but the brightest part, known as the Galactic Core, is near the constellation Sagittarius. Most everyone can relate to seeing a cloud like effect in the sky on a particularly starry night. That’s the Milky Way. It’s best to view it in the summer months as the Galactic Core stays below the horizon during the winter. It also moves across the sky during the night so you need to know what time of night to shoot. More on that below.
That brings us to a second key ingredient. You need a dark sky. If you’re in the city forget about it. You won’t get the image you probably want. You have to find a place without much light pollution. Here in Northwest Michigan the Sleeping Bear Dunes National Lakeshore is pretty much a dark sky park. That’s where we went for this shot. There’s a nice website for locating a dark sky region near you. You can check it out here. Another element to a dark sky is a moonless night. A new moon is ideal but the first few days after a new moon can also work since the moon rises after sunrise. The moon adds a lot of light to the night sky so for the best Milky Way image you want a moonless night. You can research this here.
The next thing you need to determine is where do you want to photograph the Milky Way from? You need some foreground element to place into the scene where you can then see the Milky Way above it. The sky by itself is generally not all that interesting. You need a land based foreground to give the image some depth and scale. Buildings, a mountain range, etc. So how do you know where the Milky Way will be when you’re scouting locations in the daytime? Well there’s an app for that. It’s called PhotoPills and it’s quickly becoming a favorite app for me. It’s around $10 in the App Store. It has the cool feature of incorporating augmented reality on top of the basic sun/moon/stars mapping that other apps can do. What that means is that you can point your smartphone at whatever scene you want to photograph and it will show you the scene as the camera normally does. It then also superimposes the stars onto that scene. You can set it for whatever time of day/night you want and see where the sun/moon/stars will be relative to your scene. It’s pretty powerful.
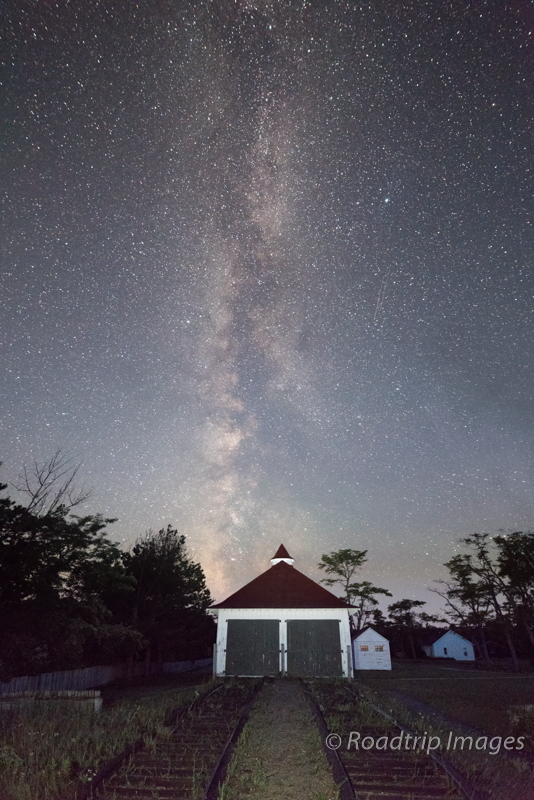
OK, so now you’ve found a subject with a dark sky that faces south so that the Milky Way will be over the top of it at 3:30 am. Yes I did say 3:30 am. You either have to stay out late or get up early to do this. Karen and I got up at 2:00 am to be on location by 3:00 am. The Milky Way would be vertical over the top of this building at around 3:45-4:15. Yeah I know. We’re kinda crazy that way. But if you haven’t seen the clear night sky from a dark sky park you’re missing out. The stars are so bright and distinct without all the light pollution from the city. This is the way God intended for us to see the night sky. It’s pretty amazing.
The scene I chose above is of an historic Coast Guard Station in the Sleeping Bear Dunes “town” of Glen Haven, MI. It’s not an active town any more as it’s part of the National Park now. This building with the cupola used to house the wooden rescue boats the Coast Guard used to go after sailors in distress out in Lake Michigan. They rolled the boats out of the building on rails and down into the water. The crewmen would then row out to the ship in distress and attempt a rescue. Not sure what their success rate was. Sounds like a pretty slow process.
Equipment & Technique
As far as camera equipment goes any newer DSLR or mirror less camera will fit the bill as it will have a sensor with low light capabilities. It needs to able to be set to full manual and be able to be set at ISO 1600-3200. A tripod will also be a must as you’ll need to shoot at shutter speeds of around 20-25 seconds. The biggest single item for a successful shoot is a fast, wide angle lens. Fast meaning an aperture of f/2.8 or faster. Anything slower and you’ll have to boost the ISO too high and the image will be very noisy. The image above was shot at f/2.8 at ISO 3200 for 25 seconds and it’s pretty noisy. A very wide angle lens is also very handy to be able to get as much of the sky as possible. 14mm in this case for a full frame sensor. The lens I picked up recently that fits this description is the Rokinon 14mm f2.8 IF UMC manual focus lens. It’s only $319 from Amazon or B&H. Only is a relative term as the 14mm Nikon Nikkor f/2.8 prime lens is pushing $1900. I wasn’t going to pop for that. The Rokinon is very sharp and highly corrected for various distortion causing optical properties and is a favorite among night sky photographers.
If you arrive in the middle of the night it will be very dark when you set up. Have some flashlights or headlamps to help with this. You’ll have to take a number of test shots to determine your composition as you can’t see anything in the viewfinder or with Live View. Use the settings above as a starting point and adjust as necessary to get the composition you want. Keep your shutter speed to 20-25 seconds. Any longer and the stars will begin to leave trails in the image since they’re constantly moving (it’s actually us moving but that’s another discussion). Take lots of images as you may catch some shooting stars in one. Change up the shutter speed and the ISO settings but leave the composition the same so you can blend images in Photoshop later.
I also played around with some light painting on the buildings but I wasn’t very happy with the results of those. During one of the 25 seconds exposures, shine your flashlight on the building and “paint” it with light. A few seconds is all that’s needed. You may have better luck than I did.
Post Processing
The post processing for an image like this can range from fairly straightforward to very complex. It just depends on the amount of image blending you choose to do. The photograph above is somewhere in the middle so I’ll just cover the highlights here. This one is a blend of two shots. One for the sky which was taken when it was still quite dark and the Milky Way was quite distinct. The second image I used was during the very early minutes of the blue hour where the buildings were starting to get some natural light. The blue hour is the hour before sunrise in this case.
I blended these two together in Photoshop using the blue hour shot as my base layer and then added the sky image in as a second layer. I used a simple gradient mask for the blending. Since this was kind of a practice run for me I didn’t use a more complicated blending method as might be required for a portfolio image. In that case, using a luminosity mask to isolate the foreground subjects and feathering the edges of the mask to smooth the blend would be in order. Much more time consuming but would result in a much nicer blend.
Once the blend is done, I then had to fix the keystone distortion that pointing a super wide angle lens up in the sky creates. This is where the sides of buildings seem to angle in at the top. I used the warp feature in the transform library of Photoshop to straighten the building sides as best as I could. The more you point the lens up, the harder it is to fix the key-stoning. I then added a brightness/contrast layer to pop the stars a little more and kept it to just the sky again using a gradient mask.
The last step was to try and remove the considerable amount of noise the image has from shooting at 3200 ISO. Google’s Nik Collections DFine module does a pretty good job of removing noise but it has a hard time distinguishing stars from noise. It did a pretty good but using some additional complex masking techniques we can remove even more of the noise.
Comments & Lessons Learned
As I mentioned in the beginning, there are a lot of Milky Way shots online these days. Some of them are quite good. Many of them are over cooked with color that’s not really there or worse yet they’re two totally separate locations. The Milky Way sky shot from one viewpoint blended with the foreground from some other time and place. I believe images should be believable and authentic. You don’t want the viewer to wonder if the image is fake. Many you see on social media sites are just that. In the case of the image above, the Milky Way did indeed line up with the building at 4:00 am just like you see here. No rotation of the sky needed.
As far as lessons learned and what I’d do differently, I’d shoot the foreground later in the blue hour when more natural light is available. Then I could use a much lower ISO such as 100 or even 64 and get less noise in the foreground. This would enable a better blend and a much sharper looking image. The full resolution version doesn’t look too bad but the foreground is definitely grainy. With a nice crisp foreground, I’d then use some of the more complicated blending techniques mentioned above.
So will I shoot the Milky Way again? Absolutely. Viewing the night sky like that is a treat. Seeing it over a nice mountain range would be even better. Granted, waking up at 2:00 am was tough but once you’re out there you forget about that. You just stand in awe of the immense sky that’s opened up above your head. It was definitely worth it.