I’ve tried doing some star trails in the past and they turn out OK but they haven’t been too interesting in my opinion. Most good landscape images need some kind of foreground element to give the picture some depth or sense of scale. Star trails are no different. They need something to anchor the photo to the ground.
The trouble is in order to do nice star trail images you need a very dark night. No moon, no light pollution and as a result, no light on your foreground. Enter light painting. I think in order to do a cool star trail photo you also need to add in some light painting to complete the photograph. Let me share how I made this one.
First, as I said, you need a very dark night. A clear sky during a new moon is ideal. At the least you need a night where the moon has already set so it’s not adding a lot of light to the sky. Second, it needs to be a clear sky with no clouds. Clouds moving across the sky will seriously mess up your image. Third, ideally it should to be a cool or cold night since heat and humidity in the atmosphere also mess up the image. Well, here in Northern Michigan, that’s a tall order. Getting that combination of conditions in the Winter or early Spring doesn’t happen very often. It’s usually cloudy in the Winter and Spring is hit or miss. So when it looked like we were going to get a clear sky night during a new moon in early May I had to go out and give it a shot.
Once you have the atmospheric things all lined up, the mechanics of getting the shot are next. I used my Nikon D810 with a 16-35mm wide angle zoom set to 16mm to capture the images. You need a tripod of course since the shot is a composite of 100 or so 30 second images made one right after the other. If you want longer trails then you need more 30 second images. If you make them too long then the photo just looks like a bunch of concentric circles. Not all that cool. I had my ISO set to 1600 and I used a remote shutter release that locks so that it acts like you have your finger on the shutter all the time. The shutter mode is set to continuous so the camera just fires shot after shot with each one being a 30 second exposure. The camera is on full manual so nothing gets changed from shot to shot including the focus. In a previous shoot I had the aperture wide open and the final image was just too dense. Too many star trails. This one was shot at f/8. You may want to experiment with different f-stops to get the one that works for you. Once you have everything set up you just let it rip. Let it run for about an hour. More if you want long star trails.
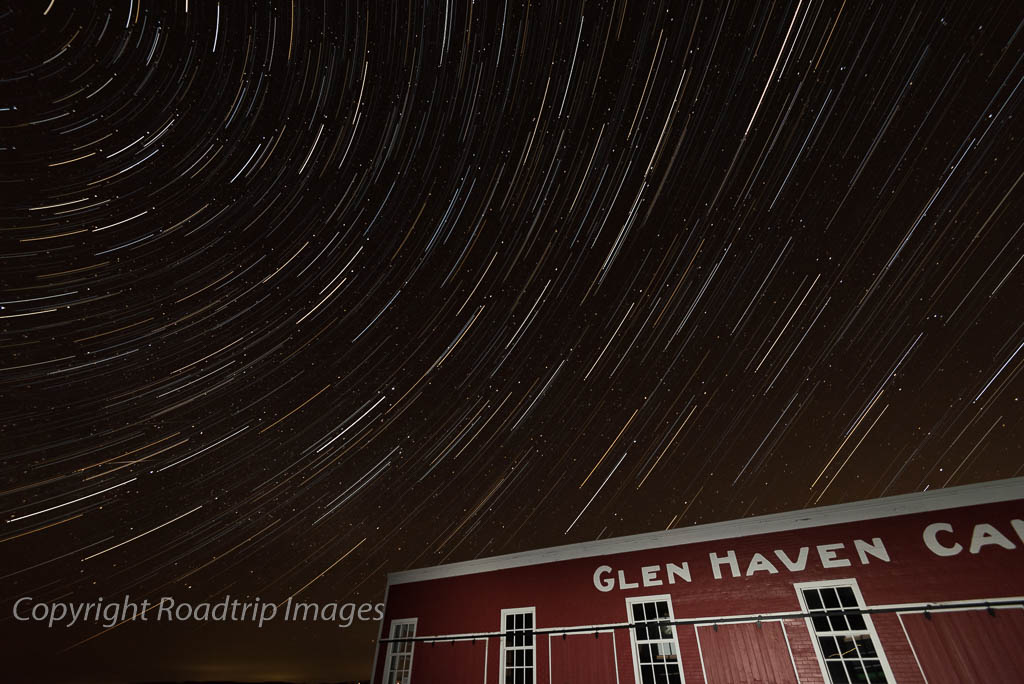
As far as composition goes, try to get something in the foreground that people can identify. Buildings work well but other objects can too. It also helps to be shooting in the Northern sky so that the North Star is either in the image or just slightly out. In this shot the North Star is just off the upper left corner of the photo. Since the stars rotate around the North Star this makes nice curved star trails. But that’s what I did so try different views and see what you like best. Do the best you can to level your camera also. It’s hard in the dark so bring a flashlight or use the level function in your camera if it has one.
At the end of the shoot, it’s time to do some light painting of the foreground. Keep the camera set up the same and during a 30 second exposure use your flashlight to just light up the foreground. In this case I just went from end to end of the building with my flashlight. One pass was enough but it depends on how bright your flashlight is. I probably had the flashlight on a total of 10-15 seconds. When you stack these up in Photoshop it’s best if the light painting shot is the final one. One additional thing I did with this image is for the last frame, I opened up the aperture to f/4. This introduced a whole bunch of “new” stars right at the end. When these frames are stacked with the ones shot at f/8 it makes it look like the star trails are sitting on top of a static star field. Kind of a neat added touch. This also allowed the light painting to come through a little stronger.
To assemble these in Photoshop, first export them as jpeg’s (if you shoot RAW) from Lightroom or some other similar software and then use the “Scripts”, “Load files into stack” function in Photoshop. Select the jpeg’s and import into Photoshop. This will bring them in as layers, one layer for each frame. Yep, you’ll have a lot of layers. Once this is done (it will take awhile), select all but the last layer which should be your light-painted foreground image. Set layer type to “lighten”. This will blend all the images together creating the star trails. If you want you can then flatten them all to one layer by right clicking (in Windows) and select “flatten images”. Then save and/or export as a jpeg. That’s it. Pretty easy.