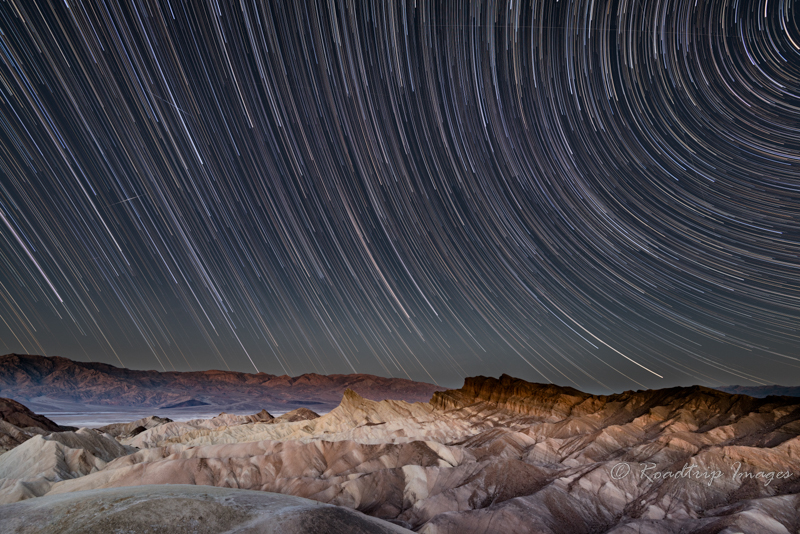
Zabriskie Point Star Trails (And how to make them)
Star trails record the movement of the stars over the course of several hours. Blending that with a recognizable foreground like Zabriskie Point takes some work.

Star Trails
The stars don’t actually move, we do. But from our perspective it seems as though they move across the sky over the course of the night. If we record that over time they would seem to leave a trail in the sky. These trails revolve around the North star in the Northern Hemisphere so the closer they are to it the tighter the curves. As you can see in the image above, the trails on the left side are pretty much straight versus the stars in upper right corner of the image. The North Star is just off the image.
In the film days the only way to make a star trails image was to do it with a very long exposure. Like an hour and a half long exposure. That’s what the trails above took. There was no exposure data for film for such long exposures so it was a trial and error process. Using today’s digital cameras these photographs are made up of hundreds of individual images blended together. It’s a much more predictable procedure.
One thing that hasn’t changed is the need for a dark sky. A moonless, cloudless, dark sky. Here in Death Valley the dark sky part is pretty easy to find. It’s certified as an International Dark Sky Park. For the moonless part, if it’s not a new moon, check what time the moon sets & rises. There may be a window where you can get a star trails shot done before it enters the picture and washes out the sky.
Setting Things Up
Even though you’re shooting the stars, you still need a foreground. The stars by themselves are not as interesting, so you need something in the foreground. I also like to include the North Star or get very close to it so the star trails are curved. Finding this combination is made easier with the help of the PhotoPils app I mention in the Resources section. It makes use of augmented reality to superimpose the stars onto the foreground scene so you can see how everything lines up.
As far as camera settings go star trails are generally shot with very wide angle lenses. 24mm or less. The image above was made at 16mm. In order to include enough sky along with the foreground a wide field of view is necessary. Second, a high ISO of around 1600 is needed to have the sensitivity to get good star trails. Most folks shoot with the lens wide open as well to get the most light gathering capability they can. f/2.8 if you have it. f/5 in my case above. The last setting is the shutter speed.
Since the photograph is a composite of several hundred individual images we need to determine how long the exposure should be for each image. Too short and the star will be too dim. Too long and the star will actually “move” enough to cause a mini trail on each image. We don’t want that. There actually is a rule of thumb for this called the rule of 600. If you divide 600 by the focal length, 16 in my case, you get 37 seconds. That’s the longest your exposure can be before mini light trails occur. I actually go less than this and use the rule of 500 and that delivers 31.5 seconds. I reduced even more and used 25 seconds for each exposure.
To make the camera shoot a sequence of several hundred 25 second images you need a locking shutter release. Set the camera up for continuous shooting, a 25 second shutter speed along with the other settings mentioned above. All of this in full manual mode. I also lock down the white balance so it doesn’t change. 5000K or so works fine. Once you press the remote shutter release, lock it and let it rip for 1-1.5 hours. Make sure you have a fresh battery and plenty of memory card capacity. And a sturdy tripod of course.
Making the Photograph
Zabriskie Point in Death Valley is an iconic landmark and I figured it would be fitting as a foreground for star trails. It also happens to be oriented the right way to get the North Star lined up the way I wanted. Again, the PhotoPils app really helps with this. To get a shot of the foreground you need some light and blue hour is a perfect time for that. Either blue hour after sunset or blue hour before sunrise. In either case it needs to be made without moving the camera from the star trails shots.
We got to Zabriskie point at around 3:15am. Yeah, that’s early. But that’s when the stars were out and the moon was gone. In order to compose the shot I cranked the ISO way up to like 10,000 just to get an image. This allowed me to get the composition set. I set the focus to infinity. Once composed, I reset the ISO to 1600. I actually started shooting at about 3:45am. It was cold and windy at Zabriskie Point at 3:45am. Even though it’s Death Valley it can get chilly at night. We actually went back to the car at one point to warm up as it was just too cold standing there for an hour and a half. At the end of the star trails sequence I un-locked the shutter release and put in a fresh battery. Now the wait for blue hour.
For the foreground shot you should put the camera settings back to a normal blue hour landscape setup. Aperture priority mode, f/8, ISO 200 or so. I made several exposures as the sky to the east began to lighten. This shot is then blended in post with all the rest of the star images I just made. By now, people were starting to show up for sunrise. Most thought we were there for that too. They were surprised to find out we had been there since 3:15am.
Post Processing the Image
The post processing is a little involved so I’m only going to give an overview here. I will have a more elaborate E-Book available soon that will go into the entire process with much more detail.
So now we have a bunch of images. To make them into one requires several steps in Lightroom and Photoshop. First is to import them all into Lightroom and make the necessary lens corrections to all the images. Do this for the foreground image also but make any other exposure & contrast adjustments as well. Then select all the star images and export them as jpeg’s. This will reduce the file size. There’s not much image information there anyway. You can also reduce the image size to maybe 2048 pixels on the long edge if you won’t be printing the image very large. This will help in the next step.
Now open Photoshop and under the “File” menu select “Scripts” and then “load images into stack”. Click “Browse” and then select all those jpeg’s you just exported from Lightroom. Hit “OK” and then go get a cup of coffee. It will take Photoshop awhile to open all those files and then create a layer for each one. Once it’s done you’ll have 200 or so layers. Now you know why you may want to reduce the image size. If they’re all full resolution files Photoshop will be trying to manage a 20+ gig file. VERY slow.
After it’s done loading, select all the layers. Select the “lighten” blending mode and voila, the star trails will appear. You can then right click on the layers and select “flatten image” and it will condense down into one manageable layer. Now save this file as your star trails Photoshop file. This star trails file can then be blended with the foreground image taken during blue hour. I won’t cover that here.
Final Thoughts
Seeing the night sky in a dark sky park like Death Valley is pretty amazing. So many stars are visible once your eyes get adjusted to the dark it’s nothing like you see in typical suburbia. The International Dark Sky Association keeps a list of certified parks on their website. You owe it to yourself to get to one of these on a clear, moonless night. Just look up and be amazed.
As always, you can see higher resolution images on our Facebook page. Please give us a like while you’re there.
Nikon D810 with Nikkor 16-35mm at 16mm. f/5 at 25 seconds. ISO 1600 for stars. f/8 at 13 seconds, ISO 200 for foreground.
Subscribe and Get Free E-Book!

Comments are closed.
