Eureka Dunes in Death Valley - Another Look
The Eureka Dunes in Death Valley are so impressive they deserve another look.

The Eureka Dunes
As we wrote a few weeks ago, the Eureka Dunes in Death Valley aren’t easy to get to. But they are worth the trip if you have a high clearance vehicle. You can read that post here. The dunes are extensive and many are quite tall. Finding a proper vantage point without tracking up potential compositions is a challenge. There is one very tall dune, roughly 750′, that seems to attract the attention of the few people that come here. That’s fine, it keeps them away from the relatively smaller dunes at the southern end of the dune field. That’s where we focused our efforts.
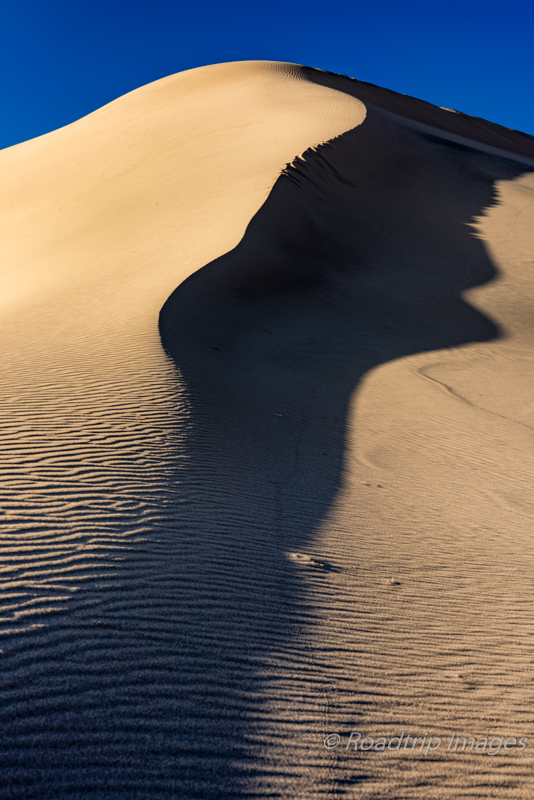
The dune above caught my attention for several reasons. First it had a nice leading line up to the crest with some wavy patterns in the sand as well. It also had a nice distinct shadow line with the sun being low in the western sky.
Making the Photograph
The scene pretty much dictated a vertical composition. With that decided, I wanted the leading line to go from the bottom left up towards the top right. This created a nice diagonal across the image. The foreground had those nice wavy patterns in the sand with just the right amount of shadow to accentuate their shapes. The peak of the dune had a nice symmetry to it so I centered it from left to right to give it visual balance in the frame. Then it was a matter of adjusting the focal length to get enough of the shadow into the image while keeping out distracting elements from the sides.
The cloudless sky was clear blue so I didn’t want too much of it in the photograph but the deep blue color does provide a nice color contrast with the sand. After all the composition decisions were made, the exposure was pretty simple. No filters were required so with the camera in aperture priority mode of f/11 and the ISO set to 64 the only thing for the camera to do was select the right shutter speed, 1/30th of a second in this case. Looking at the histogram will tell you if that was the proper exposure or not. A little exposure compensation +/- may be needed.
Post Processing the Image
There’s not a lot of modification necessary for an image like this but it does take some. The first thing I did in Lightroom was warm the image up a bit from the “as shot” color balance. I set it to about 6500K and that gave it a nice warm sand color. I also brought the shadows up a fair amount to reveal more of the details, especially in the foreground wavy patterns. Since this image is dominated by the sand dune there is not a wide dynamic range in the histogram. I expanded the whites and the blacks to broaden out the dynamic range some which effectively increased the global contrast. Lastly I gave it some dehaze to add some deep contrast and open up the image a bit more. Then off to Photoshop.
One thing about shadows under a bright blue sky. They are very blue! When you bring up the shadow value to enhance the detail you’ll notice how blue they can be. This can look OK for some scenes but here I wanted to remove the blue color cast. I did that in the Adobe Camera Raw filter (ACRF). I used the graduated filter tool to apply the blue reduction to the lower part of the image. I also enhanced the sky a bit to deepen the blue color there. A couple of hot spots existed in the sand dune to the left of the frame that needed to be dialed down a bit. I used the radial filter tool to accomplish that. The last adjustments were to add some dynamic and tonal contrast to the image. For this I used the Nik Color Efex Pro plugin. Not much but a bit to add a little more life to the sand. Then some sharpening in the sand dune and some noise reduction to the sky and the photograph was done.
Final Thoughts
The Eureka Dunes are pretty special but you don’t need to come to Death Valley to shoot dunes. There are plenty of opportunities around the country.Sand dunes can be a great place to practice composition. There are many shapes and leading lines for your photographs as well as wavy patterns in the sand that create visual interest. Take some time to think through what’s in the frame as well as what’s not. Exclude elements that pull the eye towards the edges of the image. The simpler the better for these compositions.
As always, you can see higher resolution images on our Facebook page. Please give us a like while you’re there.
Nikon D810 with Nikkor 24-70mm at 62mm. f/11 at 1/30 of a second. ISO 64.
Subscribe and Get Free E-Book!

Comments are closed.


