Glacier National Park Light Rays
Glacier NP light rays finally broke through the clouds. Glad we were in a good spot to watch.

Light Rays
As I mentioned in the previous post, we’re starting to get some smoke from wild fires west of Glacier National Park. It turns out there are a lot of them. If you do a search on smoke maps you can get some idea how bad its getting. The smoke drifts eastward or whichever way the prevailing winds are blowing. It creates a haze that hangs over the mountains and makes clear shots very difficult. One positive it does do is amplify the light ray affect when the sun back lights the clouds as it did in the above photo. It can make for some very dramatic light. Like sunlight shining through a smoky room. Looking at the map below you can see the extent of the western wildfires and how far the smoke extends. Yellow and red are heavier amounts of smoke. In some regions it’s pretty bad.

Scouting for the Shot
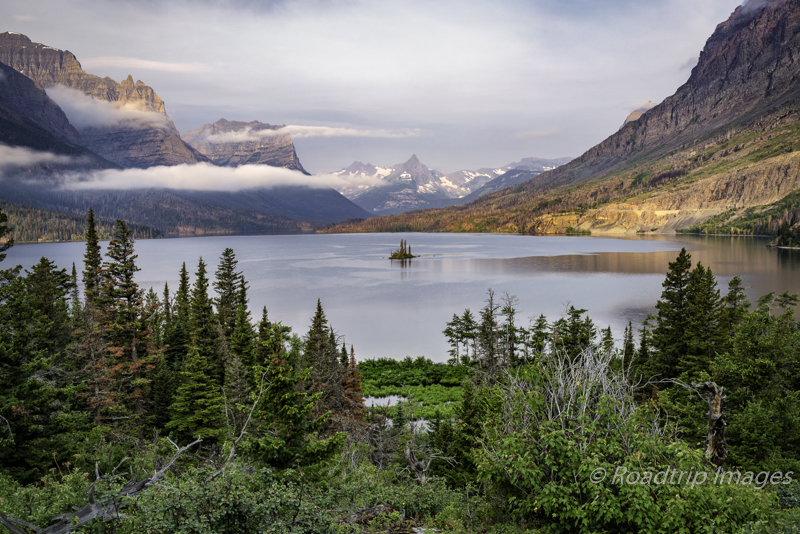
Much of landscape photography is scouting for the shot. Finding a nice composition is one thing but when will the light be at its best? Sunrise? Late in the day? Rarely do you stumble upon a scene for the first time and the light is perfect. It happens, but not very often. And the right light makes all the difference. The right light makes a ordinary scene into an extraordinary one. Or it can turn a magnificent scene into a poor one. In this case we drove the Going to the Sun road multiple times stopping at each of the turnouts to evaluate the view. If it looked promising, I checked the orientation of sun at various times in the day. Only then did we decide whether to come back and wait for the light.
And that’s another aspect of landscape photography, waiting for the light. Sometimes it comes, many times it doesn’t. But you can increase your odds by using a few research tools to know where the sun will be relative to your scene. I list some of these on the Resources Page. Setting up before the expecting time is par for the course. Get the composition set, take some test shots, evaluate the focus. And then wait for the light. Many of the drive by tourists see you set up with sometimes multiple tripods and they stop assuming there must be something going on there. I explain that I’m waiting for the light. They’re like, oh, disappointed that there wasn’t a bear or some other wildlife there. I had one person ask if I thought the mountain was going to change. I said yes, if we wait long enough.
I had a feeling that these clouds would light up once the sun got behind them. We just had to wait for that to happen. Then if the sun finds a hole in the clouds to shine through, magic happens. A little bit of something in the air helps, like mist or smoke. Not too much though.
As far as the composition goes, I wanted to use the river at the bottom as a leading line into the frame. Then it was a matter of achieving some visual balance from left to right since there are mountains on both sides. When the light rays broke through I had to adjust it a bit to center those in the shot. This is a case of being in the right place when the event happened. You don’t know for sure it will happen but you can increase your odds of being there if it does.
Since I was shooting into the sun the dynamic range was very high from the super bright sunlight to the shadows of the mountains. I knew I would have to bracket my shots to capture that wide of a range. I started with my normal 3 shot bracket of -2, normal, and +2 stops of exposure bracketing. I later decided that even that might not be enough so I went to a 5 shot bracket and offset my exposure by -1 stop. That meant that my “normal” exposure would be 1 stop underexposed. The next one down would be 3 stops underexposed, etc. I could then blend these later in Photoshop to get details in the super highlights around the sun where the “normal” exposure would just have blown out highlights with no detail whatsoever.
Post Processing
It’s a good thing I shot a number of bracketed sequences to capture the wide dynamic range of the scene. There were certainly areas of the “normal” exposure where the highlights around the sun were blown out. I was able to use a three shot series rather than a five shot series to blend the final image. I did most of this work in Photoshop. Prior to that, I adjusted each of the images in Lightroom to get as even a lighting as possible using the normal exposure for the mountains and the -2 stop exposure for the sky. The image on the left below is the adjusted -2 stop exposure and the one on the right is the adjusted normal exposure inside of Lightroom. You can see that areas of the sky in the -2 stop exposure look richer and less washed out than in the normal exposure. So by using the mountain areas of the normal exposure and much of the sky sections of the -2 stop exposure we can blend them together into the image you see at the beginning of this post. It’s a common technique for handling wide dynamic range scenes like this.
Regarding using filters to accomplish this, it’s tough when you have such a ragged edge like when a mountain range meets the sky. A neutral grad filter is very useful when the transition from bright to dark is relatively straight but with such an uneven edge like this, blending bracketed shots tends to work better.


Final Thoughts
The smoke in the atmosphere has definitely shifted our approach and plans for shooting the scenes in Glacier NP. We haven’t been able to get any clear vista shots as we had hoped. You have to make lemonade out of the lemons though and work with what nature gives you. The above image is one such example. It has also shifted our thinking to where to be for the Fall. Maybe a return visit here is in order. Perhaps by Fall the smoke will have cleared and the trees will be turning shades of yellow and gold. We’ll have to see.
Hopefully the descriptions above give you some idea on what’s involved in capturing a magical moment when the sky opens up and majestic light pours through. It’s rarely a drive by event where you pull up with your car, roll down the window and snap a photo. Many people were doing that while we were there but I’d bet theirs did not turn out quite the same. It requires a bit more work than that.
As always, you can see higher resolution images on our Facebook page. Please give us a like while you’re there.
Nikon D810 with Nikkor 16-35mm at 24mm. f/11 at 1/160 of a second. ISO 64. 1/640th of a second for the -2 stop exposure.
Subscribe and Get Free E-Book!