Karen and I have had our eye on a Habitat for Humanity group called RV Care-A-Vanners for awhile. Once we got the coach we looked around for a nearby build and found one in Louisiana. We feel very blessed with what we’ve been able to accomplish in life and have a strong desire to give back in a very tangible way. Not just monetarily but with our time and labor. In many ways time is a higher value currency as most of us lead very busy lives. The RV Care-A-Vanners are primarily retired or semi-retired couples that travel extensively in their RV’s and donate their time for Habitat builds around the country. It’s usually a two week commitment and the builds can be at various stages of completion. We signed up for a brand new build and opted to do some framing. Having built several homes in the past (doing most of the labor ourselves) this seemed like a good fit. We were joined for the first week by a group of students and their university coordinator from Carroll University in Wisconsin.
When we got to the job site we met Jason, the site supervisor from Habitat, and got acquainted with the site and the house plans. The photo below left shows the foundation system for the house that we started with. In the center photo, 6×6 beams are set on top of the block piers, leveled and fastened in place. Once these are set, the rim joists can be fastened to the 6×6 beams shown below right.


Floor joists are then placed from the rim joists across to the center beam and nailed into place. Lots of nails and lots of hammering to get the job done (left). Where the joists overlap in the center they are nailed together (center photo). Finally the joists are fastened to the center beam under Jason’s watchful eye in the photo below right.


The floor system is taking shape in the photo below left. The students are all members of a university club that works with a local Habitat for Humanity affiliate. Many had some experience on job sites but few had done any framing prior to this build. Despite this, they caught on quickly and the work progressed pretty fast. As it worked out, I spent a good amount of my time helping the students with the construction methods and taking some of the load off Jason. With this many people on the job site, he needed to focus on the next stages of construction while we kept the current tasks moving forward.
To stiffen the floor joists, solid blocking is put in between the floor joists and this is shown below center and below right.


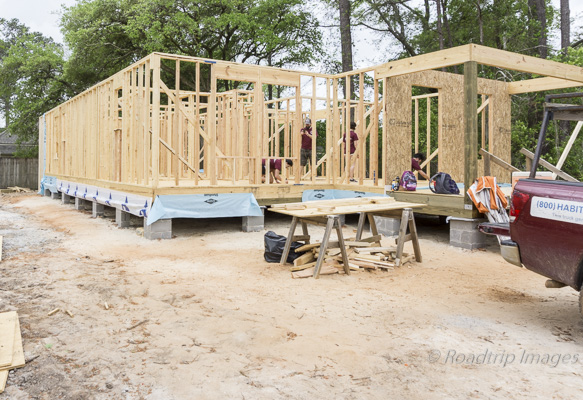
Once all the joists are set, nailed and squared up, it was time for the floor decking. Many of the 4×8 sheets of decking needed to be cut to odd sizes and I’m helping some of the students with the proper way to operate the circular saw below left. The decking is glued in place with Karen directing traffic for the subsequent panels (center). Finally, Karen is nailing the decking tight with a pneumatic nail gun (below right).


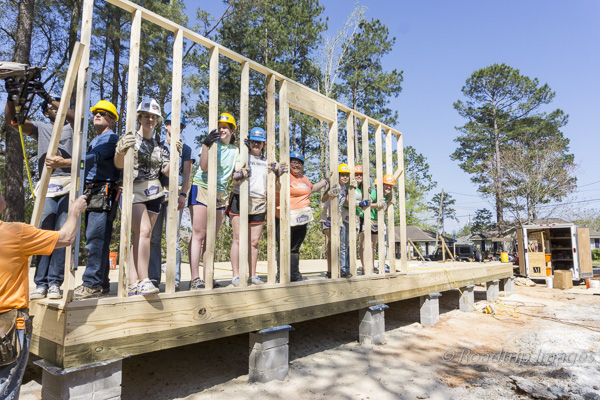
Once all the decking is down, the walls can then be built starting with the exterior first. We switched to hardhats now that lumber and tools were above our heads. In the photo below left, the students are assembling the first exterior wall section. The center photo shows us ready to go and I’m helping coordinate the lift with Jason. Below right are a group of happy faces after the first wall goes up. Always a milestone when you’re framing.


In the photo below left, more happy faces as the wall gets tacked into place and braces are set to hold it upright. The rest of the exterior walls are put up in a similar fashion. Once these are mostly in place, interior partitions can be started. The students are doing this in the center photo below. By the end of day Friday we had most of the walls built and in place. Quite an achievement considering we had just started with foundation blocks on Tuesday. A great group of students and we enjoyed their company and their enthusiasm for work. They posed for a photo below right. This was spring break for them and they could have been doing something else like most other spring breakers. Congrats to them for stepping up and working towards a higher purpose.


Well, that’s it for week one of the build. Lots of work completed and lots still to go. The rest of the walls need to be put up and then straitened and braced. Porches need to be built and then the whole house needs to be sheathed before roof trusses can go up. More on that next week.
A note to the Carroll University students: If you’d like higher resolution copies of any of these pictures, send me an email and I’ll work out a way to get them to you.