Morning in Grand Teton National Park
Another iconic scene of the old frontier days in the American West. The buck & rail fence. It makes for a nice foreground for the Teton Range.
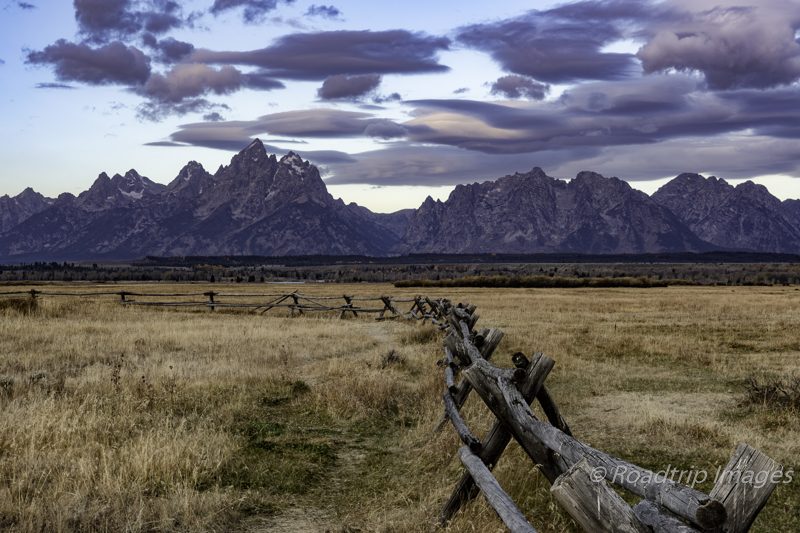
Morning Light
Morning light in Grand Teton National Park is generally the nicest part of the day. While most folks are still in their hotels or getting breakfast, we’re out shooting morning light. That’s the best light of the day here since the Teton Range faces east. A couple hours after sunrise the light is already pretty harsh. Golden hour really is only about an hour long. I especially like the blue hour prior to actual sunrise. If there are clouds to the west over the mountains and the horizon is clear to the east, you can have some pretty dramatic light.
The old adage in landscape photography is “it’s all about the light”. It couldn’t be more true in the mountains. Mid-day sun makes the mountains look pretty washed out and lifeless. Even if there are dramatic clouds in the sky the mountains still look pretty weak. The same scene in warm morning light is totally different. That’s why we use the middle part of the day for scouting. Looking for new locations and determining when the light would be best. The more time you spend in landscape photography the more you look for the color and character of the light. A great scene is important of course, but without great light it won’t make the portfolio shot you’re probably looking for. This is probably the biggest improvement beginning photographers can make. Get out there during the edges of the day when the quality of the light is generally best.
Buck & Rail Fence Line
I’ve visited Jackson Hole many times over the years and the buck & rail fence line shot has always eluded me. To be successful it needs to lead out towards the mountains as a leading line into the image. There are lots of instances of this type of fence line in the Park bit most of them run at the wrong direction relative to the mountain range. I’ve searched out numerous locations during previous visits to find one that went in the right direction only to come up short. We finally found this section of fence during our most recent visit. There are several ranches on the north end of the Park with buck & rail fences but it looked like they were private property. They had gates across the entrance roads with signs that indicated “authorized vehicles only”. One such ranch is Triangle X. Nearby there is an historic cabin site, Cunningham Cabin, so we decided to go check it out.
Walking around we found a trail that lead back to a section of fence line that looked promising. There happened to be a ranch hand nearby and we stopped for a chat. Turns out he was from Triangle X Ranch and we learned that all this land was Park Service land and we could wander around as we pleased. Triangle X was just a concessionaire running the dude ranch operation for the Park Service. I think he was looking for a reason to take a break because we ended up talking for about an hour. Nice guy. We also learned that this type of fencing is slowly being replaced by “post & wire” fencing. It’s more economical and with power post hole diggers they can be faster to construct. Too bad since the buck & rail has so much more character to it.
Not sure if this location had the perfect leading line that I was looking for but it’s the best I’ve found to date. There may be other examples on private land that are better but of course not accessible without permission.
Making the Photograph
One of the compositional elements in landscape photography is the leading line. Something that leads the eye into the image from the foreground to the main subject. It can be a natural feature of the landscape like a river or stream or it can be man made like this fence line. Not every photograph has to have this but if you study landscape photography compositions you’ll see that many employ this element. It just helps draw you into the photograph and makes the two dimensional image seem more 3D. It helps you to “see into” the photograph rather than just looking at it. It gives it some depth.
Speaking of depth, one of the techniques needed to pull off this illusion of depth is to get the whole scene in focus from front to back. That way when the eye scans from near to far in the image it’s all in focus. Just like it would be in real life. Depth of field it’s called in photography which means how much of the field of view is in focus. For a scene like this where you have items very close to the camera, the fence, as well as items many miles away, the mountains, it’s virtually impossible to get all this in focus at the same time with a normal camera. There are tilt-shift lenses available that mimic what was possible with the large format view cameras I used to shoot but without altering the plane of focus and just using standard DSLR lenses you can’t get it all sharp with one shot.
So how do you do it then? Enter focus stacking. This involves taking multiple images, all with different focus points, and blending them together later in post processing. This obviously only works with static objects like most landscape scenes. If your subject is moving then this technique won’t work very well. I generally can get by with three or four images to get a scene like this sharp from to back. I start with whatever is closest to the camera, in this case the fence rail, and then work my way back. When focused very close the depth of field is rather shallow so the second shot is focused just a little further back along the fence rail. The third shot is about a third of the way into the scene and the last shot is focused on the mountains. All these shots would be at f/11 so that I had good depth of field for each shot. They’re all on a tripod too. This is a must as you can’t have any movement between the shots.
My new Nikon D850 camera has a focus stacking function built in that will do all this automatically. You tell it how many steps to take from near to infinity as well as the depth for each step. You then focus on the nearest point and let it rip. It doesn’t blend them for you but it does do all the refocusing and shooting and then puts the images into a separate folder so you can tell the sequences apart. Pretty cool. I’m still experimenting with it to get it dialed in.
Post Processing the Image
The hardest part of a photograph like this is the focus stacking blending. There are some software apps that will do this for you but they get mixed reviews. They’re not good enough to temp me to go out and purchase one, yet. If I was doing macro photography it might be more compelling. Some of those images have 10’s if not hundreds of photographs that are then blended in post to get everything sharp. As I mentioned above when you’re focused very close the depth of field is very shallow. This is especially true in macro photography.
So, I still do this manually. There aren’t very many images to deal with and the blending is fairly easy by just using layers in Photoshop. I start with the second or third image in the sequence. When focused about a third of the way into a typical landscape scene, most of the image will be sharp. You just need to touch up the very near and very far portions of the scene. I load this image as my base layer in Photoshop. I then open the one that is focused very close and add it as the second layer. I add a mask to this layer and black it out. Then using the brush tool with the color set to white, I brush in only the very near parts of the image. Those areas that weren’t quite sharp in the first layer. This should result in an image that’s vary sharp most of the way through. If need be I then add the final image that was focused on the mountains as a third layer. I add a mask, black it out, and then brush in just the mountains and sky.
The final step to the blend it to zoom way in and look for areas that need to be touched up. You may find sections that need to be brushed in or out depending on focus. Once you have it where you want it, you can then proceed with any color adjustments or enhancements as you would with a single image. It works pretty well.
Final Thoughts
We’ve spent a little over five weeks in the Tetons this year. We experienced a wide variety of conditions and came away with several good images. We had hoped to get a few more wildlife photographs, especially elk, but they were very elusive this year. They tended to head back into the woods before there was any good light. I had the ISO cranked up pretty high to capture anything and they’re just too noisy/grainy to publish.
We’ve reached the time to head further south. The nights are getting pretty cold and RV’s are not designed for that. We’ll be heading into Utah soon and will explore some areas we didn’t get to last year. We have some maintenance to do on the rig too so a stop in Salt Lake will be in order. It was a good visit though. We always enjoy the Tetons. They have such a variety of subjects to photograph. I’m sure we’ll be back.
As always, you can see higher resolution images on our Facebook page. Please give us a like while you’re there.
Nikon D850 with Nikkor 24-70mm at 50mm. f/11 at 1/20th of a second. ISO 64.
This is our video from the Tetons
Subscribe and Get Free E-Book!
5 Comments
Leave a comment Cancel reply
This site uses Akismet to reduce spam. Learn how your comment data is processed.

Thanks for sharing these wonderful photos. Can you also provide the locations?
Glad you enjoyed the photos. I’d rather not reveal exact locations. These areas already get quite a lot of visitation.
Hi there,
I’d love to have this framed in my house. Do you sell photographs by any chance?
I shut down my online store some time ago but I can certainly do special requests. Shoot me an email at dave@roadtripimages.com and tell me what you have in mind. Thanks!
Hi there,
Do you sell your photographs by any chance? I’d love to have this framed