Milky Way Photography - Bryce Canyon
Milky Way Photography takes a few extra steps to do it right but it’s a lot of fun. Especially in a dark sky like Bryce Canyon NP.

The Milky Way
The Milky Way is the galaxy that contains our solar system. So we are in the Milky Way. The milky or cloudy look comes from all the light emitted from all the stars that can’t be resolved with the naked eye. It looks like a band across the sky because it’s actually a disk that we are a part of. For more details on the Milky Way, see this article from Wikipedia. The galactic center or core of the Milky way is in the southern sky near the constellation Sagittarius. This is the brightest part and usually what photographers want to include in their shot. The Milky Way band actually goes all the way across the sky so it’s possible to shoot a panorama going from one end of the night sky to the other. In the winter months, the galactic center tends to stay below the horizon at night so it’s not the best time to photograph it.
Setting Things Up
To successfully shoot the Milky Way with your DSLR there are a few setup items and steps. First you need a wide angle lens. The wider the better. I shot the image above with a 14mm lens on a full frame camera. This would translate to around 10mm on a crop sensor camera. Nikon calls their crop sensor DX format and Canon calls it their EF-S format. Other brands will have similar designations. You don’t need one this wide but it includes more of the sky if you have one. Just get the widest lens you can get. The second aspect of a good wide angle lens for night sky photography is its maximum aperture. In the image above I used my Rokinon 14mm f/2.8 wide angle prime lens. f/2.8 is a pretty fast lens meaning it opens pretty wide allowing for a faster shutter speed. For night sky images the faster the better or you’ll have to crank up the ISO pretty high.
As far as settings for shooting the stars, set the camera to manual mode. Automatic won’t work with light levels this low. The aperture should be wide open to let as much light in as possible. The focus should be set to infinity and set to manual so it doesn’t move. Set the shutter speed to 25 seconds so there are no star trails. We want points of light for stars, not trails. This actually depends on the focal length of the lens you’re using. Use the rule of 500 to figure this out. 500/Focal length is the longest shutter speed to avoid star trails. So 500/14=35 seconds. I pulled it back to 25 seconds for my shot to give some margin for error. ISO is set to 1600. Start there and see if that will give a bright enough star image. If your lens is slower than f/2.8, you will probably have to bump the ISO even higher. Yes the image will be noisy. Lastly set the white balance to manual and around 3600K. This will give you a cool tone blue/black sky which looks best for star shots. You can change this if your tastes require a warmer tone. If you’re shooting in RAW format the white balance setting isn’t that important.
The next major step is determining where the Milky Way will be in the night sky. It moves (actually we move) across the sky from east to west so you need to determine where it will be relative to your foreground and at what time. Best way to do that is with the smartphone app PhotoPills. I mentioned this app in this post and have it in the resources page as well. The night AR (augmented reality) feature is invaluable in determining where the Milky Way will line up with specific foreground features. In the above photograph I wanted to center it between the two foreground rock faces and the PhotoPills app told me when that would be. The image below shows the app in front of the foreground and southern sky.
The next major thing you need is a really dark sky. For those of you near the city that means you have to go somewhere else, sorry. Light pollution from large cities goes out really far so use this interactive light pollution map to see where you may be able to go near you. Along with a location free from light pollution you need a clear sky without the moon. We were in Bryce Canyon National Park during a new moon so we had to look for an opportunity to shoot the night sky. I use the weather forecasts from the app Intellicast to see what the cloud coverage will be as well as the phases of the moon and the moon rise and set times.
It’s a lot of variables to line up but they’re important. You need a clear dark sky and you need a fast, wide angle lens.

Making the Photograph
To make the photograph I blended two images together. One for the foreground shot during the blue hour and a second of the Milky Way once the sky was nice and dark. The reason for two shots is so I could shoot the foreground at a low ISO. It was made at ISO 64 during the last stages of blue hour. This gave me a nice clean noise free image for the foreground. The Milky Way shot on the other hand was made at ISO 1600. Much more noise in that image but since it’s just the stars it’s not as objectionable. If the foreground had been shot at 1600 the noise (grain) would be much more noticeable. These two images can then be blended together in Photoshop.
So get set up long before blue hour so you can compose the shot and get things positioned while there’s still good light. Camera settings for the foreground are standard landscape image settings: aperture priority mode, low ISO, f/8 or so. I shot several frames all through the blue hour. As the blue hour progresses, the shutter speed may be 10 seconds or so. That’s fine. I ended up using the last frame of the series.
Then we wait for a dark sky. Now’s the time to set the camera up for star photography. Don’t move the camera or change the focus or the blend won’t work. A good, solid tripod is a must. Set the camera to manual mode, set the ISO to 1600 and set the aperture wide open. Shutter speed is set to the rule of 500 as mentioned above. White balance is set to 3600K.
When the sky was good and dark I started shooting star images making sure the result on the back of the camera was enough exposure. I kept shooting every few minutes as the Milky Way went through its arc across the sky. If you have to the chance to see the night sky in a Dark Sky Park it’s really an amazing experience. The stars are so vivid and the constellations are very apparent. Bryce Canyon National Park has one of the darkest skies around. We hiked down into the canyon a ways to get to this viewpoint. It was a special evening. When we were done shooting it was time to hike back to the truck. Good, bright headlamps really help.
Post Processing the Image
The post processing in Photoshop can be very involved if we want to use sophisticated masking techniques like channel masking and luminosity masking. I do use these methods and they work well but they are beyond the scope of this article. For this article, I’ll walk through a simpler method to blend these two together.
First, import the images into Lightroom so we can make preliminary adjustments. Make sure all the images get the lens corrections applied. For the foreground scene, just adjust it a little darker than a normal daylight scene and pull the shadows up a bit. It needs to look a little dark since it was taken late into the blue hour. Then export this into Photoshop format.
For the stars image, you may want to adjust the color temp or white balance depending on how you set it in the camera. I like a colder tone to the night sky so I pulled this down to 3600K. I then applied some dehaze and pulled down the highlights to lessen the air glow effect at the horizon. It’s not light pollution, it’s an astronomical phenomenon. More on that can be found here. One other important adjustment is to bring up the white set point. This adds some pop to the stars and helps separate them from the sky. Once the image looks the way you want, export it to Photoshop format.
Open the foreground image in Photoshop and label the layer, foreground. Now open the stars image, copy it, and paste it in as a second layer. Label it, stars. You can then close the stars image. Add a mask to the stars layer and using the gradient tool make the transition line right at the horizon with the top part of the mask white and the bottom, black. Magic, we have a blend. There is a problem at the horizon that needs to be cleaned up but we can do that with the brush tool. The transition zone of the mask doesn’t follow the ridge line perfectly so it needs to be modified. With white selected as the foreground color and the opacity set at around 15%, carefully brush in where the night sky needs to be more prominent. Vice versa, set black as the foreground color and brush in where the foreground image needs to be more prominent. It’s a bit tedious but it works and it’s simple. It just takes a bit of time. Zoom in so you can see clearly where to brush.
After the blend is done, other image enhancements can be made such as sharpening and noise reduction. I only applied sharpening to the foreground rocks and I did noise reduction on the sky. I used masks for each of these to limit where the effect was applied.
Final Thoughts
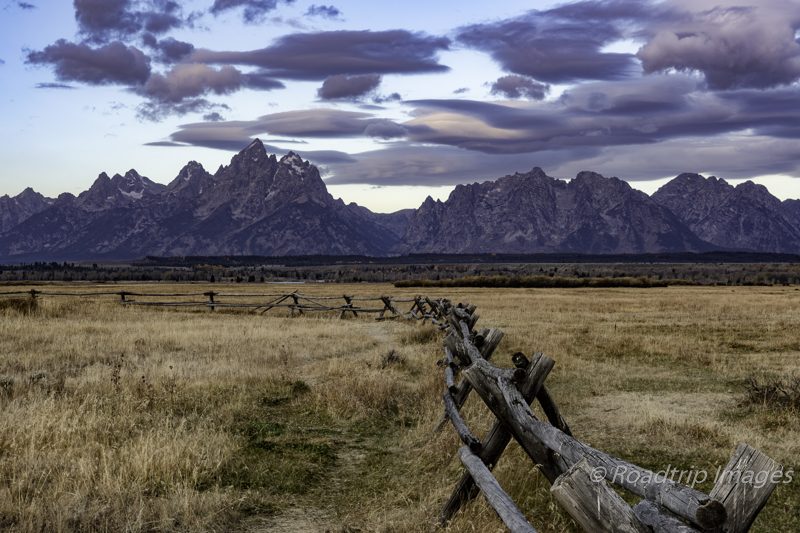
Photographing the Milky Way in a truly dark sky like Bryce Canyon NP is a real treat. With a few simple preparations you can walk away with some amazing images. Finding a suitable foreground is important as the night sky by itself doesn’t photograph as well. Adding some interesting foreground helps complete the scene.
Just viewing the night sky in places like this is also an amazing experience. It’s like nothing you’ve seen from the typical city or suburbia setting. The number of stars is simply incredible. You just don’t see these where light pollution is prevalent. It may take a little effort to get to one of these areas, but it’s worth it.
As always, you can see higher resolution images on our Facebook page. Please give us a like while you’re there.
Nikon D850 with Rokinon 14mm prime. f/11 at 10 seconds for foreground, ISO 64. f/2.8 at 25 seconds for stars. ISO 1600.
Our video on the Milky Way at Bryce Canyon
Subscribe and Get Free E-Book!