Now that we have the coach “home” it’s time to get after a few maintenance items. First up is some roof sealant repair.
When I inspected the roof on the motorhome during the buying process, I knew that I’d have to reseal the joints. I’ve done this kind of repair before so I knew it wasn’t a huge job but it is tedious. After eight or nine years of sun exposure, the caulks and sealing tapes they use on RV roofs start to break down. If not replaced roof leaks can occur and then water damage to the inside of the coach. Although these definitely need replacing, there wasn’t any sign of leaks – yet. It probably wouldn’t have been too much longer though and problems would have developed so I needed to get after this job right away. The photo below on the left is the sealing tape used on the front and rear caps on the roof. The image on the right is the caulk used around the vents, antenna’s and other fixtures mounted on the roof. They both needed to be replaced.


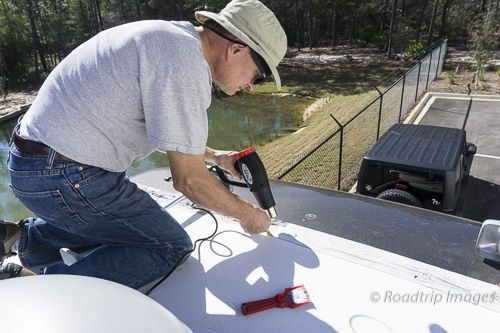
The roof itself is one piece of fiberglass. The front and back of the motorhome are also one piece molded fiberglass caps. Where these caps meet the fiberglass roof is a joint that needs to be sealed well. Fortunately all the major fiberglass sections were in good shape so no red flags there or I wouldn’t have bought the coach. These sealants are pretty easy to remove and replace but they do take some heat and some elbow grease to remove. A heat gun makes pretty quick work of removing the sealing tape as shown in the top photo. Just go easy on the heat. You don’t want to blister the fiberglass. I used a low setting on the heat gun. The caulk typically used is a self leveling compound that is put on pretty thick. Dicor is one brand I’ve used before. Some “repairs” just add more caulk on top of the old caulk which is what was probably done here. The photo below on the left shows that with some effort, all this goop can be scraped off. I used a plastic scraper so as to not scratch the roof. The photo on the right shows an antenna that has been scraped “clean”. It’s OK to have some remnants of the old sealant remain. Just get the majority of it off leaving no loose chunks.


Once all the old material has been removed, I cleaned the surfaces with denatured alcohol to prep it for the new caulk. Since I have a fiberglass roof I didn’t want to use a more aggressive solvent. Now was also a good time to tighten any loose screws holding the various fixtures to the roof. I found quite a few that weren’t tight.


After everything was cleaned up I applied the Dicor self leveling sealant around all the roof fixtures. I made sure all screw heads and any openings were well covered. It goes on pretty thick and then levels itself out somewhat. You go through a tube pretty quickly so to do a roof the size of this motorhome takes about 12 tubes.
The photo’s below show what the finished product looks like. It looks kinda messy but that’s what most self leveling compound applications look like. You want good coverage and no leaks.


It took a couple of days to scrape all the old stuff off, prep the surface and then apply the new sealant. Of course I took plenty of breaks in there too (that Florida sun is pretty intense) so it wasn’t non-stop work. Now that the job is done, the roof should be watertight for years to come. I’ll inspect it a couple times a year just to make sure everything is holding up the way it should.